
We are always looking to see which style and décor trends are hot from season to season, so that we can decorate our model homes to reflect what today’s modern and fashionable homebuyers seek. Here are a few looks that reflect what’s trending right now and expected to continue throughout the spring season – with some tips of how you can get these looks in your brand new home.
1.Green Accents

There are so many easy ways to incorporate this trend at home. As you can see in this model we did it by painting three walls within a den in a statement-style forest green. But, you could do this at home without having to get out the painting tools. Some simple green throw pillows, plants or pieces of art coordinated throughout a room – or several rooms – of your choice and your good to go. It’s also easy to trade those items out when you are in the mood for a look that’s new.
2. Earth Tones

Although green accents might feel like it would fit within the trending décor style of Earth Tones, this concept is more focused on neutrals. Minimalism and eco-conscious movements are gaining in popularity among the design world, which is why this trend makes a lot of sense for the season. We’ve incorporated it here by using lots of browns, natural materials such as wood and leather – and then weaved in a gorgeous but muted blue to complete this earth-inspired color scheme.
3. Boho

It seems this trend continues to thrive – but that doesn’t mean it doesn’t get an annual update! Boho décor is trending all over the nation, but it looks best when used in the right balance. In this adorable nursery, we chose a chunky knit rug with lots of texture in muted colors, which we then complemented in the bedding, ombre curtains and wall piece selections. The wood panel wall treatment is mellow enough to not steal the show, and the reclaimed wood dresser and staple poof completes this chic boho design.
4. Geometric Patterns
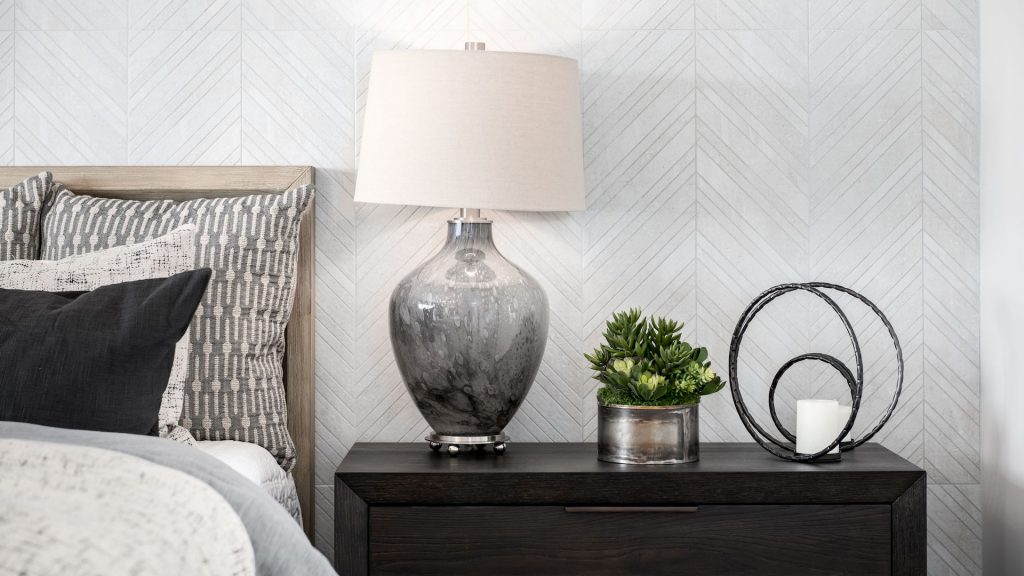
Geometric patterns have been getting hotter and hotter – and there are so many ways to implement this trend without feeling like your home space is too sharp and angular. In this cozy spare bedroom, we opted for a backsplash-inspired wall paper with a geometric chevron pattern, but in muted colors to keep the overall look serene. The pattern of the throw pillows and spherical art piece complete this look.
5. Black and White

A classic décor theme, this one comes in and out of being among the top interior design trends and it’s back for the spring season. We implemented it here with a simple approach. We opted to pull it off via the furniture and accessories, such as the bar stools, dining table and curtains, which plays off the all-white kitchen for a bold overall look.
Your bags are packed. Your hotels are booked. Your rental car is reserved. But is your budget set? Keeping an eye on your money while you’re traveling and on vacation is key to making sure you’re able to enjoy yourself and keep your finances under control.
Put it to Paper
While you’re in the planning stages of your vacation, make it a point to jot down what you think your expenses are going to be. Are you going to need to put gas in a rental car? How much are you looking to spend at restaurants? Are you bringing back any souvenirs? All of these expenses seem small when they’re on their own, but when you let them add up, you’re on a fast track to overspending.
By putting together a written budget, you are able to know exactly where you’ll be spending your money and how much you’ll be spending in these places. This doesn’t necessarily mean you need to know which restaurants you’ll be dining at ahead of time, but knowing that you won’t be spending over $400 on food while you’re in the Florida Keys or keeping your Hawaiian trinket collection to under $100 is a great way to stay on top of your finances.
Create Confidence with Cash
You’ve got a budget planned out. Great job! The planning part is complete. The only thing that’s left is to spend your heart out! (Responsibly.) Cash is the easiest way to do just that. A cash envelope system will make sure you’re keeping track of your money, and only spending set amounts in certain categories.
Another benefit of the cash envelope system is even with your finances split into different categories, the maximum amount you can spend is still set in stone. A word to the wise—put more money than you think you’ll need in the food section. While you’re traveling, you’re sure to find plenty of exciting restaurants and enticing local cuisines that will catch your fancy.
Now that you’ve got a grip on your green and know how to keep your cheddar in check, you’re set to have a memorable vacation and come back to a stable financial situation. For more ways to make the most of your money, be sure to like Lennar on Facebook.
Yes, you read that correctly: Baking soda and vinegar! Rather than spend your money on noxious chemicals, you can use these everyday kitchen ingredients to clean some of the tougher items in your home. The use of them is not only safe and pleasant (no odors), but also effective. Here are nine solutions you can try with baking soda and vinegar combined or apart.
Glass Stovetop
Remove burnt smudges from your glass stovetop without scratching the surface. Fill a spray bottle with white vinegar and lightly spritz the surface of your stove. Next, sprinkle baking soda across the surface. You may notice a reaction, as the baking soda and vinegar begin to fizz.
Soak a towel in hot water, wring it out, and lay it over the stovetop, covering the entire surface. Leave the towel there for 10 to 15 minutes. When time is up, remove the towel and use a scrub brush – a toothbrush will work – to loosen grit and stains.
Rinse the towel in hot water, wring it out, and wipe away the loosened grime and baking soda. If stubborn crud is still visible on the stovetop, take a small razor blade and carefully, without scratching the glass surface, remove one spot at a time.
After you wipe away the baking soda and gunk, lightly spray the surface with white vinegar again. Wipe it down with a damp cloth, and then buff with a dry microfiber cloth to make your stovetop shine.
Sources: How to Clean a Glass-Top Stove with All-Natural Ingredients by Mick Telkamp; A Simple and Effective Way to Clean Your Glass Stovetop by Jill Nystul
Garbage Disposal
What you cannot see can offend you, meaning your garbage disposal can stand a good cleaning every now and then, at least to fend off bad smells. Pour a ½ cup of baking soda into the mouth of your garbage disposal. Next, slowly pour in a ½ cup of white vinegar; you should hear the ingredients start to fizz. Plug the drain opening with the sink stopper and let your solution fizz while you boil a pot of water.
Your pot of water is boiling now, yes? If so, remove the sink stopper and flush the disposal, while the disposal is running, with the hot water – pour it slowly to avoid splashing. Turn the disposal off when you run out of hot water.
Side note: if you have a dual kitchen sink, this solution is more effective if applied to both basin drains.
Sources: How to Clean a Garbage Disposal by Aaron Stickley; WATCH: There is a Right Way to Clean Your Smelly Garbage Disposal by Michelle Darrisaw
Showerheads
Overtime, hard water deposits can hinder the dispersion of water from your showerhead. To remedy this, fill a plastic bag with a cup of water and a cup of white vinegar. Secure the bag to the showerhead so that the head is immersed in the solution; heavy rubber bands ought to do the trick. Let the showerhead soak for at least 15 minutes before removing the bag. Run the shower on hot to flush. Excess solution on the showerhead can be wiped away with a dry paper towel or cloth.
Source: How to Clean a Showerhead That’s Seen Better Days by Lauren Smith McDonough
Kitchen Cabinets
This cleaning hack strongly depends on the type of wood your cabinetry is made of and if it is painted. Refer to the sources below for more details.
Baking soda and vinegar can be used on wood cabinetry, whether the cabinets are natural or painted over with an oil-based paint. Fill a spray bottle with equal parts white vinegar and warm water. Mist the cabinets with the solution and let it sit for a couple minutes. When time is up, wipe the cabinetry clean with a damp paper towel or cloth, then dry all surfaces with a soft towel.
For tougher stains, make a paste that is one part warm water and three parts baking soda. Using a toothbrush, dab the paste on a stain and gently scrub it loose. Wipe away the paste and grit with a damp paper towel or cloth, then dry the surface with a soft towel.
Side note: you can use these same methods to clean the cabinetry handles, knobs, trim, and moulding.
Sources: The Ultimate Guide to Cleaning & Caring for Kitchen Cabinets by Shifrah Combiths; 10 Steps for Cleaning Your Kitchen Cabinets from Kitchen Cabinet Kings
Windows
The best time to clean your windows is on a cloudy day. Sunlight causes cleaners and other solutions to dry and evaporate too quickly, leaving streaks on your windows.
Start with the outside face of your windows, where grime builds up after every rain. In a spray bottle, mix a solution that is equal parts warm water and white vinegar. Spritz the solution over the entirety of the window and use a sponge to rub out any dirt or mold you see. For higher windows, if you do not feel comfortable on a ladder, use a sponge mop with an extendable pole. Dip the mop in your solution, wring it out, then scrub the windows.
Side note: when cleaning the windows, avoid getting the vinegar-water solution on your window frames, as it may cause discoloration, depending on the frame material and finish.
Rinse all windows (and window frames, if you fear solution got on them) with water. The most efficient way to do this may be to use a garden hose equipped with a gentle spray nozzle. Next, take a rubber-bladed squeegee and wipe the window face in straight, downward streaks to dry. Wipe the squeegee clean with a dry towel after each pass. Finish by drying the window sills and frames with a soft cloth.
Move indoors to clean the inside face of your windows. This requires fewer, more controlled steps, so as to avoid messes. Place a towel along the sill to catch any spills. Carefully spray your vinegar-warm-water solution over the face of the window. Scrub the surface with the sponge, and then wipe it dry with a soft cloth.
Bonus: Do you have window screens? Are they dirty? Prior to cleaning the windows, remove the window screens. Rinse them outside with the hose. Next, spray the vinegar-warm-water solution over the screen surface and use a soft-bristled brush to loosen any dirt. Rinse the screens again. Leave the screens out to air dry before replacing them on the windows.
Source: Helpful Hints on Cleaning Windows by Donna Boyle Schwartz and Bob Vila

Carpets
You lift a stain, but carpet fibers trap and hold its odor. To freshen your carpet, sprinkle a liberal amount of baking soda over the area that smells. Using your fingers or a dry sponge, scrub the baking soda deep into the carpet, penetrating the fibers, down to the base. Alternatively, you can use an old sock or t-shirt to do this so as to preserve the texture of a more delicate carpet.
Depending on the severity of the odor, you can leave the baking soda in the carpet for several hours or overnight. During that time, keep foot traffic off the carpet. When you are ready – you feel enough time has passed, vacuum up the baking soda. You may have to take several passes with the vacuum over the carpet, even try a hose nozzle with a bristle brush, to pick up the baking soda at the base.
Source: How to Deodorize Your Carpet Naturally with Baking Soda by Ayn-Monique Klahre
Mattress
Like your carpet, the fibers of your mattress can trap odors too. Using a sifter, liberally dust your mattress with baking soda. Rub the baking soda into the mattress with your hands, and let it sit for at least an hour. When time is up, make several passes over the mattress with the vacuum hose to pick up the baking soda.
Bonus: if you like the smell of an essential oil, like lavender, peppermint, or eucalyptus, add several drops of it to the baking soda (in its box). Shake the box, then sift the scented baking soda over the top of the mattress. This should leave a nice fragrance in place of the odor particles the baking soda absorbs.
Source: Bet You Didn’t Know You Should Be Cleaning Your Mattress – Here’s How by Sarah Lipoff
Oven
Yes, your oven has a self-cleaning function, but rather than waist the energy, or endure the smoky, foul odors, use a mix of baking soda and white vinegar to make your oven look and smell as good as new. First, remove the oven racks and soak them in warm soapy water (in the sink) for at least four hours. While the racks soak, in a bowl, make a paste that is three parts baking soda and one part warm water. Using a paintbrush, coat the inside of the oven with the paste, avoiding the heating coils. If your oven is really greasy, the paste will be more effective if left on overnight.
In the meantime, as you let the paste sit, scrub the oven racks with a non-abrasive brush or sponge to remove charred grease. Rinse, dry, and set the racks aside when done.
When you return to the oven, use a damp cloth to rub out grease stains and wipe away the baking soda paste (as best you can). Next, fill a spray bottle with white vinegar and spritz the inside of the oven. Any baking soda residue that is left will begin to fizz. Take a fresh cloth, soak it, wring it, and wipe down the inside of the oven till all traces of the vinegar-baking-soda residue are gone. When done, replace the oven racks.
Source: How to Clean an Oven with Baking Soda and Vinegar by Gina Eykemans
Grout
Be it in the kitchen or the bathroom, grout is a small surface that can be a big hassle to clean. Chemical cleaners might damage or discolor your grout, but baking soda and vinegar can safely remove stains from the porous material. In a bowl, make a paste that is equal parts baking soda and water. Using a toothbrush, spread the paste along the grout. Next, mix equal parts white vinegar and warm water in a spray bottle, and spritz the paste-covered grout. Let the solution fizz for five minutes, then scrub the grout with the toothbrush to remove loosened grime. When done, wipe away the now-dirty solution with a damp rag or paper towels.
Source: Does Cleaning Grout with Baking Soda and Vinegar Really Work? by Kate Simmons;
Disclaimer: The advice in this article should not replace the manufacturer’s recommendations for the regular care and maintenance of your home. Any products or homemade solutions used for the cleaning and supportive functionality of your home’s systems and features should be approved by the manufacturer.