
Growing up, a favorite holiday tradition for my family was to drive around the neighborhood at night, drink hot chocolate and ooh and ahh over the homes perfectly studded with lights. Peering out from the minivan window, I imagined we were driving through a magical winter wonderland.
If you’re looking to capture some of your own holiday magic at home, here are 5 steps to light up your home for the holidays.

It’s the first step because it’s the most important. No one wants to spend precious holiday moments in the ER! Even if you’re a light-hanging pro, always follow proper safety techniques. Use a sturdy ladder and avoid placing lights on trees that come into contact with power lines. Also, check your power source. Diynetwork.com suggests that “your source of power should come from a ground fault circuit interrupter (GFCI) outlet. This type of outlet will shut the circuit down if there is overcurrent. We want your lights to shine, not sparks to fly!”

You could just jump right in, but then there’s a chance you’ll find yourself several hours later, standing in the dark with a half-lit home trying determine if you bought enough strands. Planning ahead doesn’t need to take much effort and can actually save you time. It’s a good idea to take measurements to avoid several trips back to the store. This is also the time to decide where you want (and don’t) want to add lights:
Look at your house critically from the street (or take a photograph) and decide which elements would benefit most from lighting. First, consider highlighting architectural features by stringing lights along eaves, pillars, posts, windows, and doors. Next, look at bushes, trees, window boxes, and planters. Finally, think about appropriate lighting for paths and stand-alone figures. (BobVila.com)
Also, before you begin, check each strand to make sure it works. There’s nothing more frustrating than completing hours of work only to plug in the last string and nothing happens.
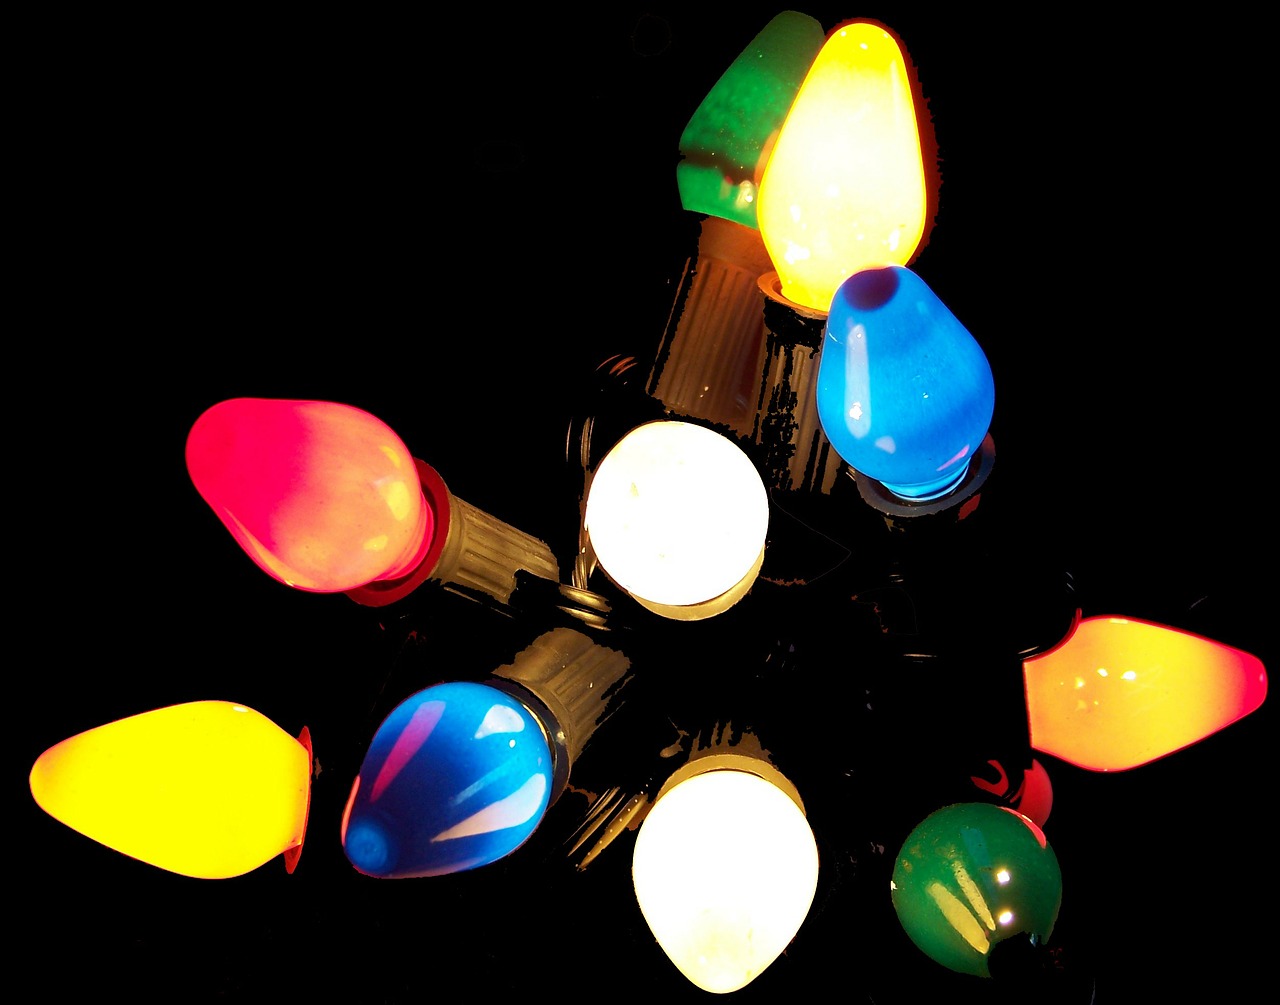
Once you have a general idea of the vision you want to achieve, determine what type of light(s) will be best for your project. Large bulbs or small? White or multi-colored? Strands or net lighting? Whatever you select (it’s hard to make a wrong choice), opt for waterproof lights made for outdoor use. Also, consider using several shorter strands rather than a few longer ones. This makes for easier replacement if one strand malfunctions.
If lining your roof and windows in lights feels like a daunting task, just focus on a few select focal points in the yard. Wrap tree trucks in lights or hang lighted spheres from the branches. Net lights make holiday outdoor decorating incredibly easy. Simply drape lights over shrubs like a blanket. Or, use small white or blue net lights and hang across the garage for an effortless snow-like effect.
Rather than using a staple gun to string up lights, use clips designed specifically for string lights. The kind you use will depend on the surface (wood, brick, stucco, gutters, etc). Learn more here.

You may feel like you’re lighting up the entire neighborhood, but your December electric bill doesn’t have to.

The work is finally done and your yard has transformed into a beautiful winter wonderland. All that’s left is to get the perfect photo for sharing on your favorite social network. Check out these tips for photographing Christmas lights. Or for us camera phone addicts, these tips from Animoto.com will help you get the best shots.
We love seeing how you decorate your home for the holidays (inside and out)! Share your beautiful photos and special moments at home on your personal Lennar Scrapbook. If you don’t have a Scrapbook, create one here. Happy Holidays!
LennarLifeSkills.com is the new home for all the information, resources, and FAQs for Lennar’s Life and Work Skills Program.
Located in Houston, TX, the Life and Work Skills program was conceived by Bob Strudler in 2005 to provide a bridge to the workplace for people with intellectual disabilities.
In creating the Life and Work Skills Program, Lennar has been able to make a lasting impact in the lives of the 175 students with intellectual disabilities who have graduated from this program over the course of the last 11 years. During the 10-month program, students learn skills used in an office and home environment, including computer training, resume building, budgeting, first aid, cooking, social media and more.
Since its inception, hundreds of Lennar Associates and other volunteers have been given the opportunity to make a difference in the lives of the students, their families and coaches.
The 12th year will begin in January 2016 with 15 new students. Learn more at LennarLifeSkills.com.
It’s the great national debate! One popular design trend has stirred passionate discussions and strong opinions. Across the internet, homeowners weigh in… mount a TV above the fireplace?
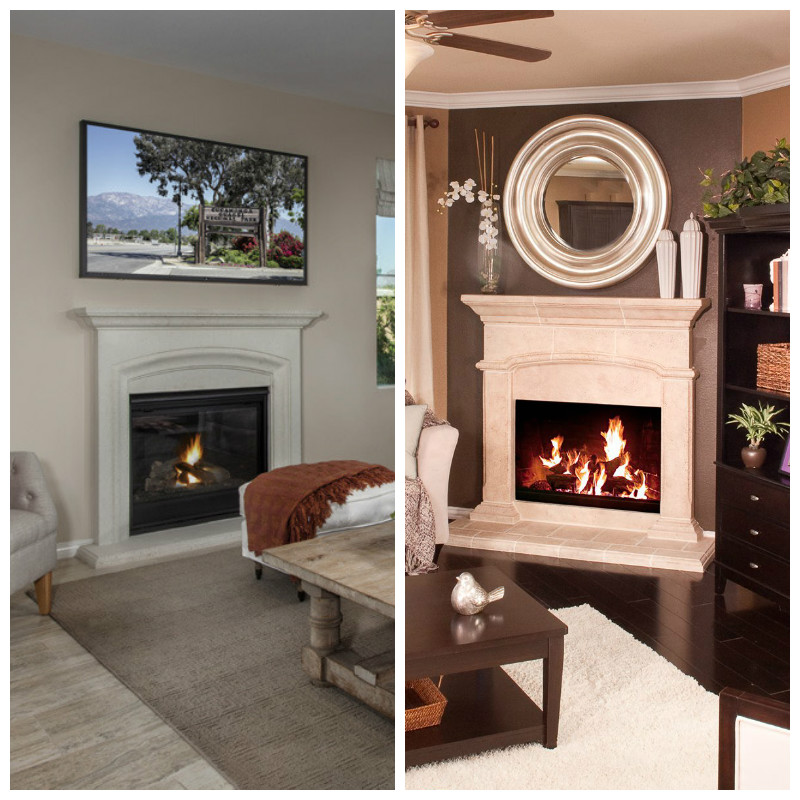
Traditionally, the space above the fireplace was reserved for family portraits, treasured artwork, or (if you’re like me), a large trendy mirror. As slick and lightweight flat screen TVs gained popularity, mounting above the mantel seemed like a natural fit, and with good reason. Fireplaces and TVs both enjoy reining as the living room center of attention.
On the plus side, a TV above the fireplace can create the ultimate entertainment center and free up valuable living room real estate. In an article from Better Homes & Gardens, Ann Wilson explains:
Hanging a flat screen above a mantel or on a brick fireplace’s face results in a dual-purpose entertainment center that becomes a room’s visual centerpiece. The TV-hearth partnership frees up valuable floor space, allows you to focus furniture arrangements on a single wall, and generates pleasing views for channel-surfers and fire-watchers alike.
Disagree? You’re not alone. The arguments against a TV above the fireplace include: a strained neck, concern for mixing heat and electronics, and, well… it’s just not everyone’s style preference. Geoffrey Morrison from CNET states his case:
Mounting a TV up and out of the way above a fireplace seems logical, convenient, and undeniably cool. However, there are serious issues with such placement…. mounting a TV above a fireplace isn’t the best idea for the you or for the TV. Placement is a big issue, and location and TV height can be significant factors when it comes to picture quality.
When it comes to home design, we all have our own preferences inspired by culture, tastes and personal style. Ultimately, your home should be a place where you feel relaxed, happy and comfortable, no matter what’s above your fireplace. If you’re thinking about a wall-mounted TV in your home, it’s a good idea to check with a professional to ensure proper installation and wiring.
What do you think of a TV above a fireplace, yay or NAY? (See what other people have to SAY)


Your daughter just bought her first home. Dear friends moved across the country. Your parents prepare to host the holidays in their new dream home. As the gift giving season approaches, you may be thinking of the special new homeowners in your life. If you’re looking for the perfect gift, from practical to unique, these eight ideas are sure to delight any new homeowner.

Want more ideas and inspiration for new homeowner gift giving? Check out Lennar’s Housewarming Gifts board on Pinterest!
Source links:
1. Craftsman Evolv 24 pc Homeowner Tool Set // Sears.com
2. GardenHOME Garden Tool Set All-In-One // Amazon.com
3. Cuisinart® 13-Piece Wooden Grill Tool Set // BedBathAndBeyond.com
4. Hometown Delrome Map Puzzle by Map Marketing // Fab.com
5. Takeout Menu Organizer // Amazon.com
6. Personalized Slate with Artisan Cheeses // GiftTree.com
7. Play Ball Gift Bucket // HarryBarker.com
8. Family Outdoor Plaque // MarkandGraham.com
Do you have a space in your home where you store leftover wrapping paper? You’ve probably bought and used it to wrap gifts for numerous birthdays, baby showers, holidays, weddings and many other important events. Keeping your schedule organized is necessary when remembering to buy a gift, but you probably don’t think about keeping your wrapping paper organized. You roll up the unused portion and toss the tube back into storage where they unravel and crinkle.
Well, we saw a solution that is not only easy to do, but will help organize your wrapping paper in no time! All you need are a few household items: two paper towel tubes, scissors, tape, and wrapping paper. Cut one side of each paper towel tube down the middle, wrap them both around the center of the wrapping paper tube (make sure they overlap), grab a piece of leftover wrapping paper, place it around the paper towel tubes and tape the edges together. Follow the same steps for the rest of your wrapping paper collection and you will have a nicely organized space with no unraveled or crinkled wrapping paper!
Watch this How To U video to see it in action!
Looking for a few inexpensive fall touches for around your home or need the perfect Thanksgiving centerpiece? If you have five minutes, you still have time to get your home décor in the fall spirit! This new video from What’s Up Moms shows you step-by-step how to make three different projects to complete your home’s fall look.
Each one only takes about five minutes to complete, and you may have most of the supplies already on hand. If not, plan a quick trip to the nearest craft store. Many fall decorating items are now on sale at significantly reduced prices to make room for the winter holidays.
Pine cone trees
These adorable pine cone trees are simple, stylish and would make a terrific centerpiece at your Thanksgiving table. Use them to decorate empty spaces along the buffet table or group together in sets of three and place on a mantle, bookshelf or coffee table. You only need three supplies to complete this project – and one of them you may easily find in your own backyard! Change up the paint color to coordinate with the rest of your home décor.
Leaf luminaries
Luminaries are a beautiful way to inject some fall spirit into your home while creating a warm and cozy ambiance. Use different size glass containers (you may already have them around your home), and place throughout your living room and kitchen. Unscented tea lights would work well, but warm fall-inspired scents like cinnamon, apple, pumpkin, and vanilla will add a nice touch to your fall décor.
Monogram fall wreath
This wreath makes a quick project that can be easily customized to fit your style. Send the kids to the back yard or go for a family walk to source items like pinecones, colorful leaves, acorns and any other embellishments you can find. Personalize your front door for the holidays, or make one for a friend for a thoughtful hostess or housewarming gift.
Orange is the happiest color! It’s hard to disagree with Frank Sinatra’s famous quote. The color orange is a popular choice for creating an inviting and invigorating interior design. Plus, no other color is used more to identify with the fall season. From pumpkins and falling leaves to crackling fires and sun sets on a crisp autumn night, orange evokes feelings of comfort and warmth. Due to its versatile nature and variety of hues available, the happiest color can complete your home design year round.
If you’re looking to warm up a room, add joyful energy, or just get creative with pops of color, here are some orange-spirational ways to use orange throughout your home.
According to Homeedit.com, orange is an ideal way to add warmth to a reception room. What better way to welcome friends and family into your home than a room bathed in warm tones? If you love color but red feels a little too aggressive, orange is the perfect alternative, especially for open great rooms.


Orange is fun and sassy and usually unexpected (TraditonalHome.com). And what’s more fun than unexpected pops of color by way of pillows, vases, and wall décor? Orange accessories give a room personality, without the commitment of paint.


Bold but not blinding, an orange accent wall works well in any room. Transform a blank canvas into a room you’ll love coming home to anytime.


You may not think so, but orange plays nicely with other colors and can be used to enhance an existing color palette. Blues, whites, and creams all pair nicely with your favorite orange hue.


Need more color inspiration? Check out Lennar’s Dream in Color boards on Pinterest.
What’s your favorite color to use in interior design? Let us know in the comments below!
With solar home options becoming more popular, less expensive, and easier to maintain than ever before, it may be time to rethink going solar. Solar systems empower homeowners with the choice of clean, renewable energy, and can save you money while conserving precious resources. Across the U.S., the use of solar power is on the rise, and continued growth is expected. If you’ve considered solar in the past, but thought it may be too expensive or difficult to care for, this new article from Zillow addresses some of the common myths associated with solar homes. SunStreet Energy Group, a subsidiary of Lennar, currently offers state-of-the-art solar systems in select communities throughout California, Nevada, Colorado, and Texas, with more coming soon.
The decision to add solar panels to your home can seem daunting. The unknowns and assumptions of costs and installation tend to leave homeowners uneasy about going solar.
However, just as home automation once seemed overwhelming, adding solar panels to your home is becoming more of the norm. U.S. solar power grew 30 percent in 2014 from 2013 — with the Solar Energy Industries Association expecting continued growth through 2016.
California already generates more than five percent of its “annual utility-scale electricity generation from utility-scale solar power,” becoming the first state to do so.
The reasons to invest in solar panels are abundant. In addition to increasing your home’s value and saving money on your electric bill, solar panels also help homeowners decrease their carbon footprint. Within 20 years, a residential solar power system can offset literally tons of carbon dioxide.
Addressing the myths
If you’re still skeptical, know that quite a few myths about going solar exist. Here are the most common myths about solar panels.
Read the full article: Why You Need to Get Serious About Going Solar


Whenever I’m in the kitchen, from cooking dinner to cleaning up after, having music on in the background is always preferred. Since my phone never leaves my side, it’s likely my go-to source for tunes. Unfortunately, it can get difficult to hear my favorite songs over the sound of the dishwasher, running water and sautéing vegetables. This article from The Kitchn shows you how to turn simple items found right now in your kitchen into makeshift speakers. While you won’t get quite the same quality as store-bought speakers, you can at least make the music loud enough to help cover up any off-tune singing. This takes personal jam sessions – complete with a spatula microphone, to a whole new level.
If you want to listen to tunes in the kitchen, you can opt to shell out money for an iPhone speaker set, or you can go the DIY route. Yes, that’s right — your kitchen already holds a bunch of ways you can amplify the sound from your iPhone; options that don’t require batteries or an electrical outlet. Or, for that matter, spending any money at all.
While these options are clearly not actual speakers, they can boost the quality of the sound, making what you’re listening to sound fuller. Keep these hacks in mind when you’re traveling, hanging out at the park or in the backyard, or cooking in a vacation rental kitchen — no need to pack actual speakers!
For the first four options, all you have to do is place the iPhone directly into it. These also help keep your phone clean and out of the way from any inadvertent kitchen food splatters.
The last option requires a pair of scissors and a little arts-and-crafts action.
{Get all of the details: 5 Cheap Ways to Make iPhone Speakers for the Kitchen | The Kitch}
